Print Checks
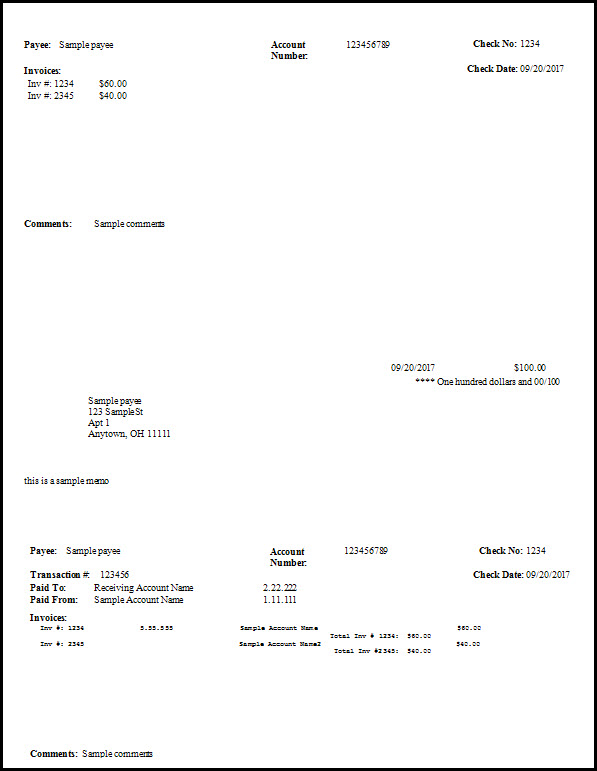
After you post transactions on the Pay Bills screen, each transaction posted with Computer Check as the payment method can then be found on the Print Checks screen. Use the Print Checks screen to print checks onto preprinted check paper that has been approved.

- Select the Check Date by clicking it from the dropdown box. This is the date that will be printed on the check.
- Choose an existing Check Layout from the dropdown list.
- The default layouts that come with Church Windows will all say [Template] and then the name of the layout. These templates cannot be modified or replaced, however they can be used as a starting point as long as you enter a new name when you save the layout. Any layout that you modify or create cannot have [Template] before the name of the layout.
- If you have check paper you wish to use, you can also design your own check layout by clicking Check Designer and saving a custom layout you make under a specific name.
Note:
When naming a new report layout, keep in mind that you are creating a template which can be used for other reports with different data in the future, therefore names should NOT include specific dates or the search criteria you used to compile the report. Instead, the name should indicate what kind of information will be included in the report. - After doing so, the name you choose will then appear in the Check Layout dropdown list for you to select and apply.
- Click the dropdown box to select one of the desired Assets with Checks to Print.
- Enter a Starting Check Number to automatically assign a Check # to each Payee in the Checks to Print list.
- You could also enter a Check # manually in the Check # column below for each Payee individually by typing in the row for the specific payee.
- If you want to use the next consecutive check # available, click the Get Next Check Number button and the box will be populated for you with the next sequential number.
- To have information appear in the Memo field of the check, enter the information on the Memo field in this screen. (The Check Layout you choose must also have the Memo field added to the layout in order for the information typed here to show on the printed check.)
- A check will print for each Payee that has a check marked in the corresponding Print box. Click to remove the
 checkmark if you wish to refrain from printing a check for the payee.
 - Click the Print button at the bottom of the screen when you are ready to print your checks. A Print Preview screen will show you the layout of the check contents ready to be printed.
- You can close and make any adjustments you need to either the Check Layout or the options chosen on the Print Checks screen.
- Click the Print button on the Print Preview screen to print out the checks.
- When the printing has finished, close the Preview screen. A message will ask you "Did the checks print correctly?" Answer by clicking Yes or No.
- If you click No, an additional screen will ask you to indicate which checks, if any, printed correctly. Place a checkmark in the Printed Correctly? box next to only the checks that printed correctly.
- Otherwise, do not place a check in the box.
- Then click the OK button to return to the Print Checks screen and continue to any additional check printing you may need for the checks that did not print correctly.
- If you click No, an additional screen will ask you to indicate which checks, if any, printed correctly. Place a